|
|
马上注册,结交更多好友,享用更多功能^_^
您需要 登录 才可以下载或查看,没有账号?立即注册
x
本帖最后由 愷龍 于 2021-9-19 15:47 编辑
Panel 面板:
Panel 必须存在与容器中显示 不能独立显示
Panel 面板和 Frame 窗口用法基本一致
通过 add 来进行添加一些组件
四种布局模式:
- frame.setLayout(LayoutManager mgr) //参数为LayoutManage对象 LayouMannager是一个接口
BorderLayout 类 东南西北中布局模式
- import java.awt.*;
- public class TestBorderLayout {
- public static void main(String[] args) {
- Frame frame = new Frame("东西南北中");
- Button button1 = new Button("East");
- Button button2 = new Button("west");
- Button button3 = new Button("south");
- Button button4 = new Button("north");
- Button button5 = new Button("center");
- //添加东西南北中效果
- frame.add(button1,BorderLayout.EAST);
- frame.add(button2,BorderLayout.WEST);
- frame.add(button3,BorderLayout.SOUTH);
- frame.add(button4,BorderLayout.NORTH);
- frame.add(button5,BorderLayout.CENTER);
- frame.setSize(526,526);
- frame.setVisible(true);
- }
- }
FlowLayout 类 流式布局模式 从左到右 从上到下
- import java.awt.*;
- public class TestFlowLayout {
- public static void main(String[] args) {
- Frame frame = new Frame();
- //设置按钮
- Button button = new Button("yuyan1");
- Button button1 = new Button("yuyan2");
- Button button2 = new Button("yuyan3");
- //设置为流式布局
- frame.setLayout(new FlowLayout()); //默认居中
- // frame.setLayout(new FlowLayout(FlowLayout.LEFT)); //左
- //添加按钮
- frame.add(button);
- frame.add(button1);
- frame.add(button2);
- //显示
- frame.setVisible(true);
- }
- }
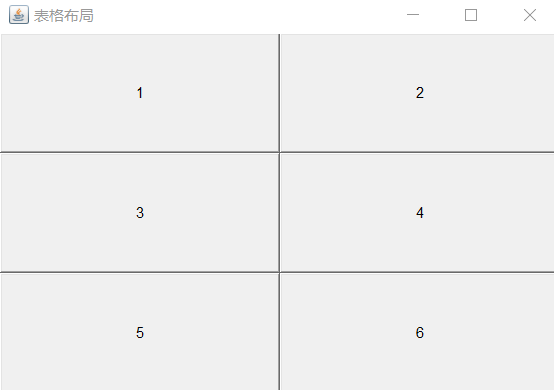
GridLayout 类 栅格式布局模式 表格模式 几行几列
- import java.awt.*;
- public class TestGridLayout {
- public static void main(String[] args) {
- Frame frame = new Frame("表格布局");
- Button button1 = new Button("1");
- Button button2 = new Button("2");
- Button button3 = new Button("3");
- Button button4 = new Button("4");
- Button button5 = new Button("5");
- Button button6 = new Button("6");
- //设置行列
- frame.setLayout(new GridLayout(3,2));
- frame.add(button1);
- frame.add(button2);
- frame.add(button3);
- frame.add(button4);
- frame.add(button5);
- frame.add(button6);
- //Java的函数,自动布局
- frame.pack();
- frame.setVisible(true);
- }
- }
这三个类都是 LayouManager 接口的实现类
- frame.setLayout(new FlowLayout()); //流式布局 组件呈流失分布 从左向右 从上到下
- frame.setLayout(new BorderLayout(int hgap, int vgap)) //东南西北中布局 组件呈特定方向排布 默认为中 center
- frame.setLayout(new GridLayout(int rows, int cols, int hgap, int vgap)) //将窗口分成几行几列的表单 每个组件占一格分布 //hgap vgap 为容器内行 列 间隔 可以不填默认无间隔
具体用法:
- Button b=new Button("我是按钮组件");
- frame.add(b); //自动流式布局
- frame.add(b,BoderLayout.WEST); //将按钮向西排列布局 BoderLayout类中已经设置好了布局位置的静态常量可以直接调用
- //BoderLayout.EAST : 东 BoderLayout.CENTER : 中
- frame.setLayout(new GridLayout(2,2)) //栅格布局 将窗口分为两行两列
- frame.add(b) //按钮位置在窗口左上方 占窗口四分之一大小
上面是三种布局模式
绝对定位布局:
根据组件设置的坐标 自动相对于窗口定位
设置坐标: 1. setLocation (int : x , int : y) 2. setBounds (int : x , int : y ,int : width , int : height)
- frame.setLayout(null) //绝对定位
- Button b=new Button("按钮")
- b.setLocation(100,100); //设置按钮在窗口内的位置坐标
- frame.add(b) //将按钮添加到窗口上 按钮在 x 为100 Y 为100的位置上
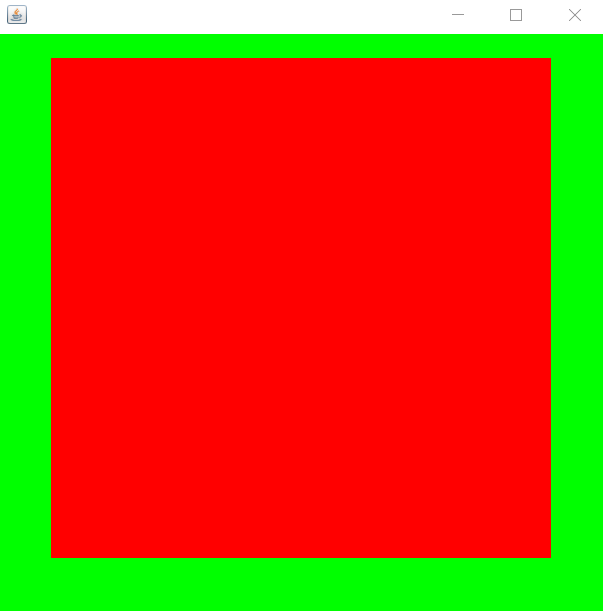
面板:
- import java.awt.*;
- import java.awt.event.WindowAdapter;
- import java.awt.event.WindowEvent;
- import java.awt.event.WindowListener;
- public class TestPanel {
- public static void main(String[] args) {
- Frame frame = new Frame();
- Panel panel = new Panel();
- //设置布局
- frame.setLayout(null);
- //坐标
- frame.setBounds(300, 300, 500, 500);
- frame.setBackground(Color.GREEN);
- //panel设置左边,相对于frame
- panel.setBounds(50, 50, 400, 400);
- panel.setBackground(Color.RED);
- //frame.add(panel)
- frame.add(panel);
- frame.setVisible(true);
- //监听事件,监听窗口关闭事件system.exit(0)
- //适配器模式
- frame.addWindowListener(new WindowAdapter(){
- //窗口点击关闭时需要做的事情
- public void windowClosing(WindowEvent e){
- //结束程序
- System.exit(0);
- }
- });
- }
-
- }
一个小实践
- import java.awt.*;
- import java.awt.event.WindowAdapter;
- import java.awt.event.WindowEvent;
- public class Test {
- public static void main(String[] args) {
- Frame frame = new Frame("作业");
- frame.setSize(526,526);
- Panel panel = new Panel();
- Panel panel1 = new Panel();
- Panel panel2 = new Panel();
- Panel panel3 = new Panel();
- panel.setBounds(0,0,50,526);
- panel1.setBounds(50,0,426,263);
- panel2.setBounds(50,263,426,263);
- panel3.setBounds(476,0,50,526);
- //便于区分
- panel.setBackground(new Color(58, 65, 219));
- panel1.setBackground(new Color(21, 220, 151));
- panel2.setBackground(new Color(224, 208, 63));
- panel3.setBackground(new Color(231, 125, 98));
- frame.add(panel);
- frame.add(panel1);
- frame.add(panel2);
- frame.add(panel3);
- Button button1 = new Button("1");
- Button button2 = new Button("2");
- Button button3 = new Button("3");
- Button button4 = new Button("4");
- Button button5 = new Button("5");
- Button button6 = new Button("6");
- Button button7 = new Button("7");
- Button button8 = new Button("8");
- Button button9 = new Button("9");
- Button button10 = new Button("10");
- panel.setLayout(new GridLayout(2,1));
- panel1.setLayout(new GridLayout(2,1));
- panel2.setLayout(new GridLayout(2,2));
- panel3.setLayout(new GridLayout(2,1));
- panel.add(button1);
- panel.add(button2);
- panel1.add(button3);
- panel1.add(button4);
- panel2.add(button5);
- panel2.add(button6);
- panel2.add(button7);
- panel2.add(button8);
- panel3.add(button9);
- panel3.add(button10);
- //监听事件,监听窗口关闭事件 System.exit(0)
- //适配器模式:
- frame.addWindowListener(new WindowAdapter() {
- @Override
- public void windowClosing(WindowEvent e) {
- //结束程序
- System.exit(0);
- }
- });
- frame.pack();
- //frame.setResizable(false);
- frame.setVisible(true);
- }
- }
|
|
 ( 粤ICP备18085999号-1 | 粤公网安备 44051102000585号)

 狗仔卡
狗仔卡 发表于 2021-8-25 17:12:17


 置顶卡
置顶卡 千斤顶
千斤顶 显身卡
显身卡