|
|
马上注册,结交更多好友,享用更多功能^_^
您需要 登录 才可以下载或查看,没有账号?立即注册
x
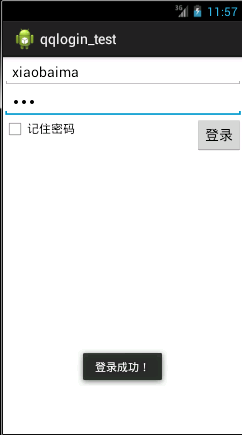
实现原理概述:
通过客户端输入用户名和密码,然后提交到服务端进行验证的过程!因为考虑到是联系,数据较小,所以服务端的用户名与密码就存到list集合里面了!
首先,需要配置服务端的代码!这里是有sevlet来实现的:
- package cn.cxrh.daomain;
- import java.io.IOException;
- import java.util.*;
- import javax.servlet.ServletException;
- import javax.servlet.http.HttpServlet;
- import javax.servlet.http.HttpServletRequest;
- import javax.servlet.http.HttpServletResponse;
- import org.omg.CORBA.Request;
- import cn.cxrh.daomain.*;
- import com.sun.xml.internal.bind.v2.schemagen.xmlschema.List;
- public class UserSer extends HttpServlet {
- @Override
- protected void doGet(HttpServletRequest req, HttpServletResponse resp)
- throws ServletException, IOException {
- // TODO Auto-generated method stub
- boolean flag = false;
- ArrayList<User> users = new ArrayList<User>();
- users.add(new User("xiaobaima","123","2014-11-07 17:14:45"));
- users.add(new User("xiaojiayu","345","2014-11-07 17:18:34"));
-
- String username = new String(req.getParameter("username"));
- String password = req.getParameter("password");
-
- System.out.println("username=" + username);
- System.out.println("password=" + password);
- if(username != null && !"".equals(username) && password != null && !"".equals(password))
- {
- for(User user : users)
- {
- if(username.equals(user.getUsername()) && password.equals(user.getPassword())) 如果用户名与密码匹配的话
- {
- resp.getOutputStream().write("登录成功!".getBytes()); //就给送这个数据给客户端
-
- flag = true;
- break;
- }
- }
-
- if(!flag)
- {
- resp.getOutputStream().write("登录失败!".getBytes());
- }
- }
- }
- @Override
- protected void doPost(HttpServletRequest req, HttpServletResponse resp)
- throws ServletException, IOException {
- // TODO Auto-generated method stub
- this.doGet(req, resp);
- }
- }
首先是访问互联网的权限:
- <uses-permission android:name="android.permission.INTERNET"/
然后在java代码里面写交互的代码:
- public static byte[] loadDate(InputStream is) throws Exception
- { <font color="#2e8b57">//将服务端像客户端发来的输入流里面的数据转化为字节数组的形式</font>
- ByteArrayOutputStream bos = new ByteArrayOutputStream();
- byte[] buffer = new byte[1024];
- int len = -1;
-
- while((len = is.read(buffer)) != -1)
- {
- bos.write(buffer,0,len);
- }
- is.close();
- bos.close();
- return bos.toByteArray();
- }
首先要说明的是一般的写法有两种:
1.用HttpURLConnection实现:
其关键代码如下:
GET请求:
- String path = "http://192.168.0.115:8080/qqServer/loginServlet?username=" +
- URLEncoder.encode(username,"utf-8") + "&password="+URLEncoder.encode(password,"utf-8");
- URL url = new URL(path);
- HttpURLConnection conn = (HttpURLConnection) url.openConnection();
- conn.setRequestMethod("GET");
- conn.setConnectTimeout(5000);
-
- int code = conn.getResponseCode();
-
- if(code == 200)
- {
- InputStream is = conn.getInputStream();
- return new String(loadDate(is),"GBK");
-
- }
- String path="http://192.168.0.115:8080/qqServer/loginServlet";
- String data = "username=" + URLEncoder.encode(username,"utf-8") +
- "&password=" + URLEncoder.encode(password,"utf-8");
- URL url = new URL(path);
- HttpURLConnection conn = (HttpURLConnection) url.openConnection(); //获取链接的对象
- conn.setRequestMethod("POST");
- conn.setConnectTimeout(5000);
- conn.setRequestProperty("Content-Type", "application/x-www-form-urlencoded");
- conn.setRequestProperty("Content-Length", data.length()+"");
- conn.setDoOutput(true);
- conn.getOutputStream().write(data.getBytes()); //获取输出流,将data的参数发出去
-
- int code = conn.getResponseCode(); //接收返回码
-
- if(code == 200)
- {
- InputStream is = conn.getInputStream(); //通过链接对象获得输入流
- return new String(loadDate(is),"GBK");
- }
2.用HttpClient实现:
GET请求:
- String path = "http://192.168.0.115:8080/qqServer/loginServlet?username=" +
- URLEncoder.encode(username,"utf-8") + "&password=" + URLEncoder.encode(password,"utf-8");
- HttpClient client = new DefaultHttpClient();
- HttpGet httpGet = new HttpGet(path);
- HttpResponse response = client.execute(httpGet);
-
- int code = response.getStatusLine().getStatusCode();
-
- if(code == 200)
- {
- InputStream is = response.getEntity().getContent();
- return new String(loadDate(is), "GBK");
- }
- String path = "http://192.168.0.115:8080/qqServer/loginServlet";
- HttpClient client=new DefaultHttpClient();
- //创建请求路径的HttpGet对象
- HttpPost httpPost=new HttpPost(path);
-
- //建立一个List集合,集合中的类型为NameVluePair对象
- List<NameValuePair> list=new ArrayList<NameValuePair>();
- list.add(new BasicNameValuePair("username",username));
- list.add(new BasicNameValuePair("password",password));
- UrlEncodedFormEntity entity=new UrlEncodedFormEntity(list,"utf-8");
- //设置实体数据
- httpPost.setEntity(entity);
- //让HttpClient往服务器发送数据
- HttpResponse response=client.execute(httpPost);
- //找到服务返回的状态码 200表示成功
- int code=response.getStatusLine().getStatusCode();
- if(code==200)
- {
- InputStream is=response.getEntity().getContent();
- return new String(loadDate(is),"GBK");
- }
这样的话,主线程就不会容易造成主线程的堵塞问题:
- new Thread()
- {
- public void run()
- {
- String data = SendDataUtils.HttpPostSendData(username, password);
- if(data != null)
- {
- Message msg = Message.obtain();
- msg.what = 1;
- msg.obj = data;
- handler.sendMessage(msg);
- }
- }
- }.start();
恩~~ 以上就是普通的实现方法,可是还有一种更加简单的实现方法就是,利用网上的一个开源框架来实现;
这需要在网上下载这个jar文件:android-async-http-1.4.5.jar;值得注意的是这个开源框架是基于阿帕奇服务的!!
其主要实现的代码如下:
GET请求的实现:
- String url = "http://192.168.0.115:8080/qqServer/loginServlet?username=" +
- URLEncoder.encode(username,"utf-8") + "&password="+URLEncoder.encode(password,"utf-8");
- AsyncHttpClient client = new AsyncHttpClient();
- client.get(url, new AsyncHttpResponseHandler() {
-
- @Override
- public void onSuccess(int arg0, Header[] arg1, byte[] arg2) {
- // TODO Auto-generated method stub
- try
- {
- Toast.makeText(MainActivity.this, new String(arg2,"GBK"), 0).show();
- }catch(Exception e)
- {
- e.printStackTrace();
- }
- }
-
- @Override
- public void onFailure(int arg0, Header[] arg1, byte[] arg2, Throwable arg3) {
- // TODO Auto-generated method stub
-
- }
- });
- String url = "http://192.168.0.115:8080/qqServer/loginServlet";
-
- username = URLEncoder.encode(username,"utf-8");
- password = URLEncoder.encode(password,"utf-8");
- AsyncHttpClient client = new AsyncHttpClient(); //异步http
- RequestParams params = new RequestParams(); //请求参数
- params.put("username", username); //将用户名设置进去
- params.put("password", password);
- client.post(url, params,new AsyncHttpResponseHandler() { //调用post方法
-
- @Override
- public void onSuccess(int arg0, Header[] arg1, byte[] arg2) { //回调方法
- // TODO Auto-generated method stub
- try
- {
- Toast.makeText(MainActivity.this, new String(arg2,"GBK"), 0).show();
- }catch(Exception e)
- {
- e.printStackTrace();
- }
- }
-
- @Override
- public void onFailure(int arg0, Header[] arg1, byte[] arg2, Throwable arg3) {
- // TODO Auto-generated method stub
-
- }
- });

|
|
 ( 粤ICP备18085999号-1 | 粤公网安备 44051102000585号)