|
|
马上注册,结交更多好友,享用更多功能^_^
您需要 登录 才可以下载或查看,没有账号?立即注册
x
今天先把json那个路由做出来,就是在注册页面上面script标签那个post的路由,把主启动文件代码修改为:- var express = require('express');
- var mymodel=require('./db/db.js');
- var doregist = require('./control/doregist.js');
- var bodyParser=require('body-parser');
- var dosignin = require('./control/dosignin.js');
- var app = express();
- app.set('view engine','ejs');
- app.use(express.static('./public'));
- app.use(bodyParser.urlencoded({ extended: false }));
- app.use(bodyParser.json());
- app.get('/',function(req,res,next){
- res.render('./home.ejs');
- });
- app.get('/regist', function (req,res,next) {
- res.render('./regist.ejs');
- });
- app.post('/myjson',function(req,res,next){
- mymodel.find({},function(err,result){
- res.json(result);
- });
- });
- app.get('/signin',function(req,res,next){
- res.render('signin.ejs');
- });
- app.post('/doregist',doregist);
- app.post('/dosignin',dosignin);
- app.listen(3000);
然后还要做signin.ejs文件,在views目录下新建signin.ejs文件:- <!DOCTYPE html>
- <html lang="en">
- <head>
- <meta charset="UTF-8">
- <meta name="viewport" content="width=device-width, user-scalable=no, initial-scale=1.0, maximum-scale=1.0, minimum-scale=1.0">
- <title>FISHC RESTAURANT</title>
- <link rel="stylesheet" href="bootstrap3/css/bootstrap.min.css">
- <script src="bootstrap3/js/jquery.min.js"></script>
- <script src="bootstrap3/js/bootstrap.min.js"></script>
- <script>
- var name=[];
- var flag=true;
- $.post(
- '/myjson',
- function (data) {
- for(i=0;i<data.length;i++){
- name[i]=JSON.stringify({username:data[i].username,password:data[i].password});
- }
- });
- </script>
- </head>
- <body class="container">
- <%include header.ejs%>
- <h1 class="page-header text-center">Welcome to sign in page</h1>
- <form action="dosignin" method="post" onsubmit="return myjson()">
- <div class="input-group">
- <span class="input-group-addon">@</span>
- <input id="username" name="username" style="ime-mode:disabled" type="text" class="form-control" placeholder="Username">
- </div>
- <div class="input-group">
- <span class="input-group-addon">@</span>
- <input id="password" name="password" type="password" class="form-control" placeholder="password">
- </div>
- <button class="btn btn-default">submit</button>
- </form>
- <div class="text"></div>
- <script>
- function myjson() {
- var a=JSON.stringify({username:$('#username').val(),password:$('#password').val()});
- if((name.indexOf(a))==-1){
- flag=false;
- alert('您的用户名和密码不匹配,请重新登录');
- window.location='http://127.0.0.1:3000/signin'
- }
- return flag;
- }
- </script>
- </body>
- </html>
这个页面主要是验证一下数据库里是否有这个用户名跟密码,如果有就转到下个页面。
我们还是同样要在control目录下新建dosignin.js文件,然后把下列代码写进去:- module.exports = function(req,res,next){
- res.render('dosignin.ejs',{username:req.body.username});
- }
这里面又要用上dosignin.ejs这个模板文件,我们也要在views目录下新建这个文件代码如下:- <!DOCTYPE html>
- <html lang="en">
- <head>
- <meta charset="UTF-8">
- <meta name="viewport" content="width=device-width, user-scalable=no, initial-scale=1.0, maximum-scale=1.0, minimum-scale=1.0">
- <title>FISHC RESTAURANT</title>
- <link rel="stylesheet" href="bootstrap3/css/bootstrap.min.css">
- <script src="bootstrap3/js/jquery.min.js"></script>
- <script src="bootstrap3/js/bootstrap.min.js"></script>
- </head>
- <body class="container" ng-app="">
- <%include header.ejs%>
- <h5 class="page-header text-left" id="username"><%=username%></h5>
- <h1 class="page-header text-center">您已登录成功 请点餐</h1>
- <table class="table table-hover" ng-controller="cartcontroler">
- <label style="width: 100%">查找<input type="text" class="form-control" style="width: 20%" ng-model="search"></label>
- <tr><th>id</th><th>菜名</th><th>购买数量</th><th>价钱</th><th>状态</th><th>总价</th><th></th></tr>
- <tr ng-repeat="item in cart|filter:search">
- <td>{{item.id}}</td>
- <td>{{item.name}}</td>
- <td><button type="button" class="btn btn-danger glyphicon glyphicon-plus" ng-click="add(item.id)"></button>
- {{item.count}}
- <button type="button" class="btn btn-danger glyphicon glyphicon-minus" ng-click="sub(item.id)"></button>
- </td>
- <td>{{item.price|currency}}</td>
- <td>{{item.statu}}</td>
- <td>{{item.price*item.count|currency}}</td>
- </tr>
- <tr>
- <td colspan="5">您购买的总价格:{{totalprice()|currency}}</td>
- <td><form action="admin" method="post"></form>
- <button type="button" class="btn btn-danger" ng-click="fn()">提交</button>
- </td>
- </tr>
- </table>
- <script>
- if($('#username').html()=='admin'){
- $('<input type="submit" class="btn btn-danger" value="管理员页">').appendTo($('form'))
- }
- var cartcontroler=function($scope) {
- $scope.cart=[{
- id:1,
- name:'宫保鸡丁',
- count:0,
- price:100,
- statu:'有货'
- },{
- id:2,
- name:'鱼香肉丝',
- count:0,
- price:100,
- statu:'有货'
- },{
- id:3,
- name:'红烧甲鱼',
- count:0,
- price:100,
- statu:'有货'
- },{
- id:4,
- name:'燕京纯生',
- count:0,
- price:50,
- statu:'有货'
- },{
- id:5,
- name:'米饭',
- count:0,
- price:10,
- statu:'有货'
- },{
- id:6,
- name:'羊肉串',
- count:0,
- price:20,
- statu:'有货'
- }];
- function findIndex(id){
- var index=-1;
- angular.forEach($scope.cart,function(item,key){
- if(item.id==id){
- index=key;
- }
- });
- return index
- }
- $scope.add = function (id){
- var index=findIndex(id);
- if(index!=-1){
- $scope.cart[index].count++;
- }
- }
- $scope.sub = function (id){
- var index=findIndex(id);
- var item=$scope.cart[index].count;
- if(index!=-1){
- if(item>0) {
- $scope.cart[index].count--;
- }
- }
- }
- $scope.fn=function(){
- var myfood={};
- var foods=[];
- myfood.user=$('#username').html();
- angular.forEach($scope.cart,function(item,key) {
- if(item.count!=0){
- foods.push(item.name+item.count);
- }
- });
- myfood.price=$scope.totalprice();
- myfood.foods=foods.join();
- var a=confirm(myfood.user+'您定了'+myfood.foods+'总价:'+myfood.price);
- if(a){
- $.post(
- '/myjson2',
- myfood
- );
- window.location='http://127.0.0.1:3000/submit'
- }
- }
- $scope.totalprice=function(){
- var total=0;
- angular.forEach($scope.cart,function(item){
- total+=(item.price*item.count);
- });
- return total;
- }
- }
- </script>
- <script src="angular-1.2.32.min.7zip.js"></script>
- </body>
- </html>
还要在public目录下(我们之前建的静态文件夹)放进已经下载好的angular模块的文件。
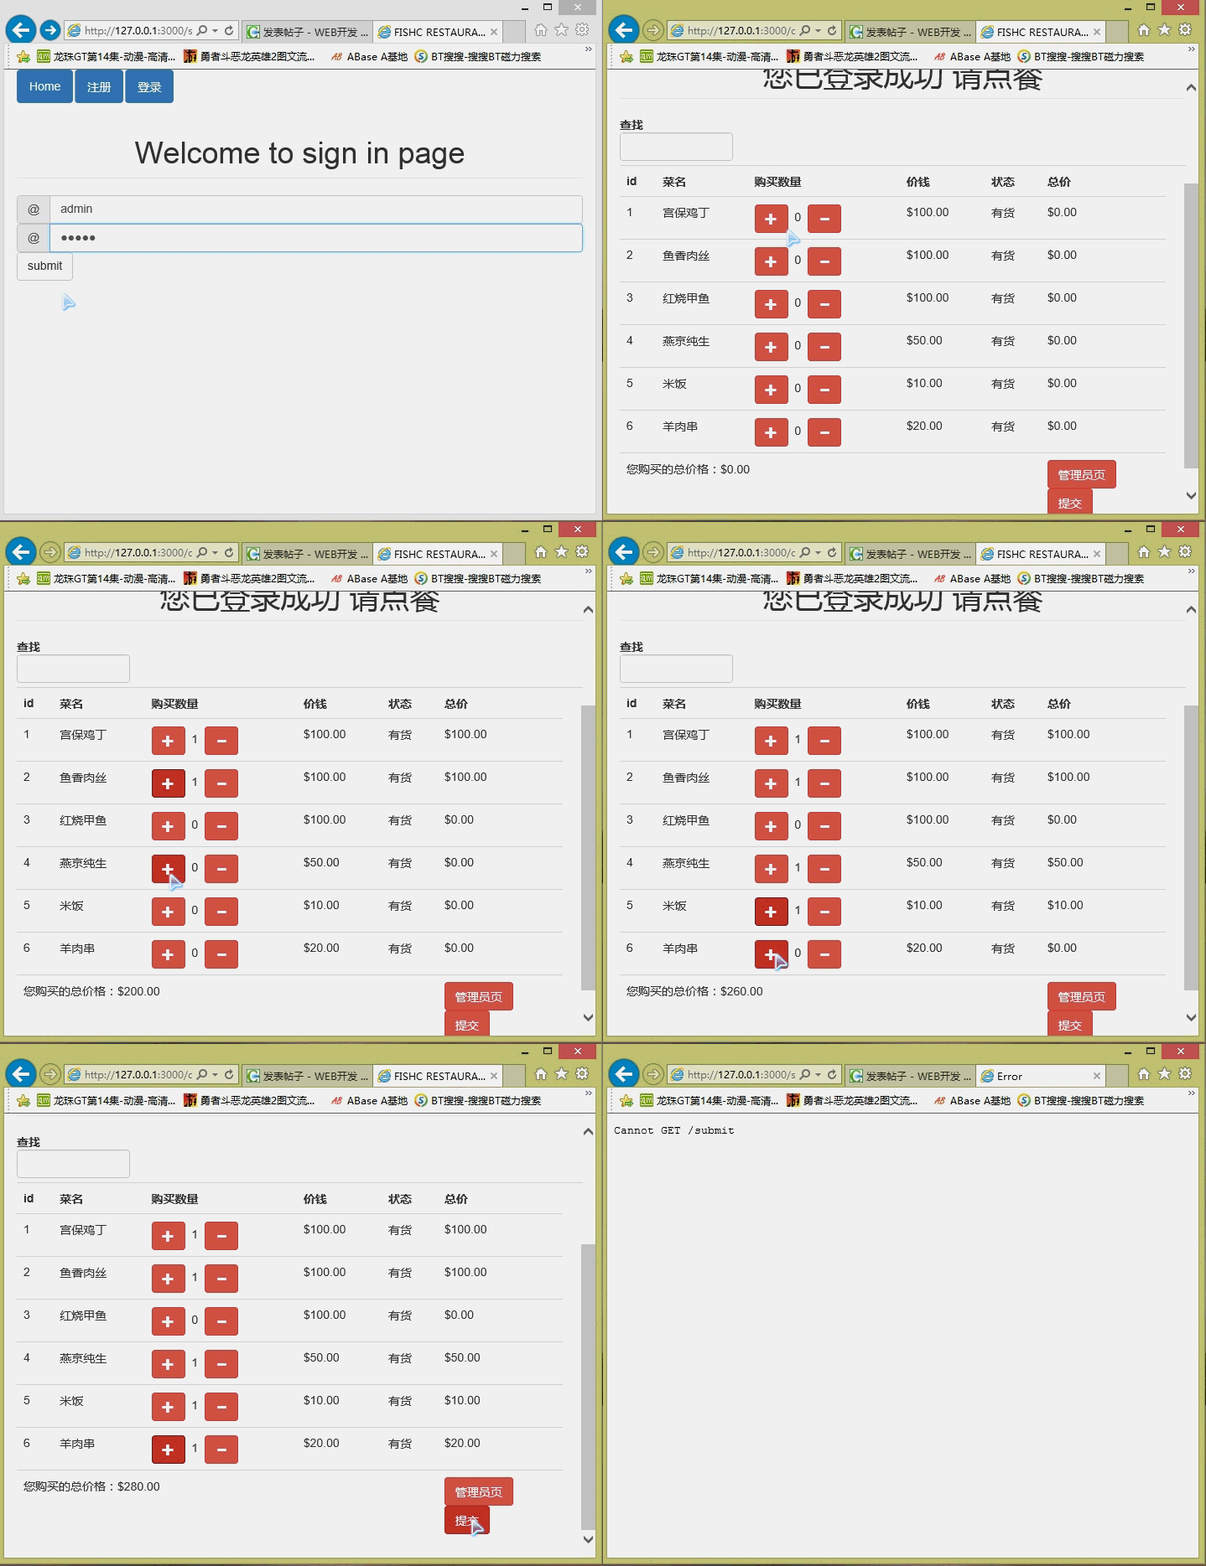
这是最复杂的一个后端模板文件,里面用到了后端模板的变量例如<%=username%>这个就是我们从后端传来的用户名,还用到了angular这种前端模板的变量例如{{item.name}},这是点的菜的名字。angular善于处理表格,这种动态代码如果用原生的写要上千行代码可能。下面我们展示一下这个页面:

这个页面的数字会随着点击加减按钮自动变换,这就是angular可以做到数据双向绑定,实时更新数据的特性,因为我用的是管理员账户登录所以会出现管理员按钮,如果用普通用户名就没有这个按钮。明天进行最后一讲 |
评分
-
查看全部评分
|
 ( 粤ICP备18085999号-1 | 粤公网安备 44051102000585号)